Skip to product information
1 of 3

Locks of Hair

Body Wave Headband Wig - 150% Density No Glue Natural Hair

Body Wave Headband Wig - 150% Density No Glue Natural Hair

Regular price $144.00 CAD
Regular price Sale price $144.00 CAD
Sale Sold out
Shipping calculated at checkout.
Title

The Real Talk About Headband Wigs

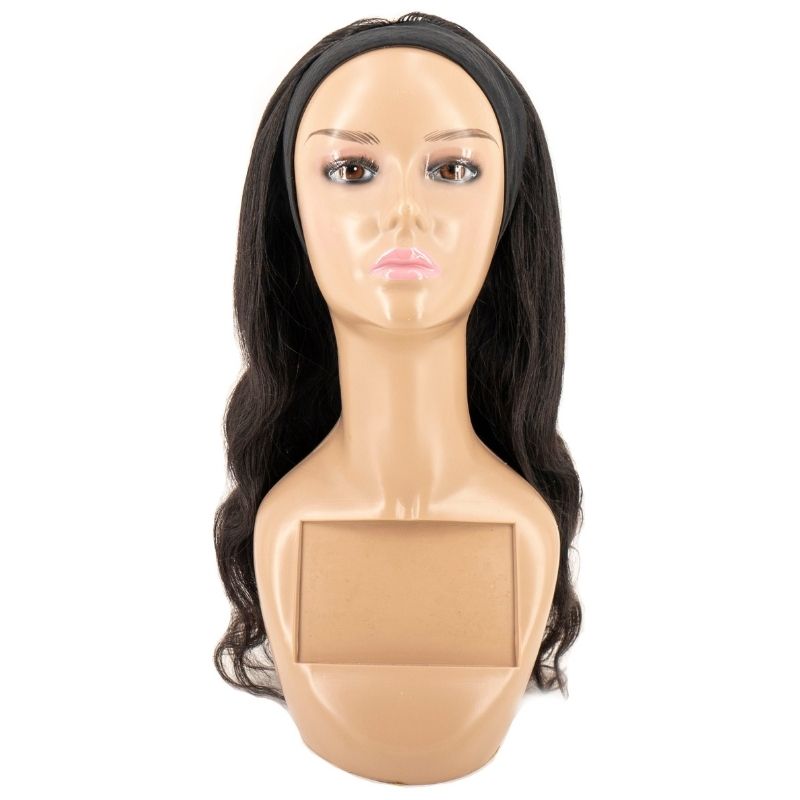
Okay, so remember when I spent THREE HOURS trying to get my lace front to lay flat for a Zoom call, only to have it lift halfway through? Girl, that's when I discovered headband wigs and honestly... my morning routine has never been the same. This Body Wave Headband Wig? It's literally saving me from myself at this point.

Not gonna lie, I was skeptical at first. Like, how is something this easy gonna look natural? But here's the thing: when you get quality virgin hair with the right density (this 150% is that sweet spot), it actually looks like you just threw a cute headband on your own gorgeous hair. No glue. No Got2B. No prayers to the wig gods.

Specifications

Feature Details
Hair Type 100% Human Hair
Hair Style Headband
Density 150%
Hair Grade Virgin Hair
Hair Color Natural 1B
Coloring Can lift to a #27

What Makes This Hair Different

Here's what really sold me on this particular headband wig. First off, it's actual virgin human hair, which means when I say I can curl it, straighten it, or even color it lighter (up to that gorgeous honey blonde #27), I'm not exaggerating. I've literally worn mine straight on Monday, added beach waves for date night Wednesday, and by Sunday I'm rocking full glam curls. Try that with synthetic and you'll have a melted mess on your hands.

The body wave texture though? That's where this really shines. You know how some waves look perfect in the package but drop out the second humidity hits? Not these. The wave pattern actually holds because it's been properly processed into the hair. Even after washing (yes, you can wash it like normal hair), those S-waves bounce right back with just a little scrunching.

And can we talk about the 150% density for a second? It's full enough that nobody's gonna see your actual hairline through it, but not so thick that you look like you're wearing a helmet. When I worked in the salon, this is exactly the density we'd recommend for clients who wanted volume without the obvious "I'm wearing hair" look.

The Technical Details That Actually Matter

Here's the thing about headband wigs that nobody really explains: the construction is everything. This one has that adjustable band in the back (think bra strap style), plus combs inside for extra security. But honestly? Once you adjust it to your head size, you probably won't even need the combs. I wear mine to the gym and it stays put through cardio.

The natural 1B color is that perfect off-black that blends with pretty much everyone's roots. But since it's virgin hair, if you want to add highlights or go lighter, you absolutely can. Just remember it can safely lift to about a #27, which is that beautiful honey blonde. Any lighter and you're risking the integrity of the hair.

Installation? Girl, we're talking 30 seconds. Literally put your hair in a low bun, slide this on like a regular headband, adjust the back, and go. I keep one in my car for emergency good hair days. The included headband is basic black, but here's a pro tip: switch it out with any headband from Target or wherever to match your outfit. Instant style change.

Bottom Line

Real talk: if you're tired of the whole lace front production or just want something you can throw on for grocery runs that still looks expensive, this is it. Quality virgin hair that acts like YOUR hair, easy installation that even beginners can handle, and versatility to style it however you want. The freedom of not being glued down? Priceless. Your edges will thank you, and honestly, so will your schedule.

View full details

Braiding Extended FAQs - Everything Else You're Wondering

Wig Extended FAQs

Why does my lace look ashy or white after I apply it, even though it matched perfectly before?

Girl, this drove me CRAZY for months until I figured it out. So basically, what's happening is your glue or adhesive is drying white underneath the lace. Not gonna lie, I ruined a beautiful HD lace wig trying to fix this with concealer (terrible idea). Here's what actually works: First, make sure you're using thin layers of adhesive. Like, thinner than you think. Let each layer get completely clear and tacky before adding the next. If you're using Got2B Glued gel, the yellow tube dries clearer than the black one. Also... and this was the game changer for me... powder your skin BEFORE applying the glue, not after. Use a powder that matches your skin tone, apply it where the lace will sit, then apply your adhesive. The powder creates a barrier that prevents that ashy cast. If it's already happened? Take a tiny bit of rubbing alcohol on a Q-tip and gently dab the white spots from underneath. Works like magic, but be gentle or you'll lift the lace.

How do I stop my wig from sliding back throughout the day, especially when I'm sweating?

Real talk, this used to happen to me constantly. I'd check my phone camera at lunch and my hairline would be, like, an inch higher than when I left the house. First thing: that elastic band in your wig? Tighten it. I know it seems obvious, but most of us wear our wigs too loose because we're scared of headaches. You want it snug but not painful. Second, the stocking cap method is your best friend here. I spray Got2B Glued on my stocking cap, let it dry completely (use a blow dryer on cool if you're impatient like me), then cut around my hairline. This creates a tacky base that grips the wig even without gluing the actual lace down. For summer or workout days? Add a thin layer of Bold Hold Active right at your hairline... just a tiny strip where you sweat the most. My trick for the gym is to wear a cute headband over the front edge. Nobody questions it, and it keeps everything locked in place. Oh, and if your wig has combs? Actually use them! I ignored mine for years thinking they'd damage my hair, but properly positioned combs are what keep your wig from that slow backward creep.

Can I really do overnight heatless curls on a human hair wig, or will it damage the hair?

YES, you can, and honestly? Heatless methods are actually better for your wig's longevity! I've been doing this for years. My go-to method: slightly damp hair (not soaking), flexi rods or soft rollers, and patience. The key is "slightly damp"... if the wig is too wet, it won't dry overnight and you'll get that musty smell (learned that the hard way in 2019, never again). I spray my wig with a mix of water and leave-in conditioner, just enough to make it pliable. Roll it up, put the wig on a wig stand near a fan or in a well-ventilated area. By morning? Gorgeous curls without any heat damage. The curls actually last longer than curling iron curls because you're not breaking down the hair structure with heat. Pro tip from my cosmetology training: add a tiny bit of mousse before rolling for extra hold. Just remember, human hair wigs don't have natural oils from your scalp, so they're actually more fragile than your own hair. Heatless is always the move when you can swing it.

My wig looks wiggy in photos with flash. How do pros make wigs look natural in pictures?

Oh my God, the flash struggle is REAL. I used to avoid photos at events because my wig would literally glow different from my bio hair. Here's what changed everything: dry shampoo. I'm serious! That slight mattifying effect makes your wig photograph exactly like bio hair. Spray it lightly all over, focusing on the hairline and part. It cuts the shine that screams "WIG!" in photos. Also, and this is huge... blend your edges. Even if your wig has baby hairs, pull a few of your own hairs out around your temples and edges. That transition zone is what cameras pick up on. For the part, I learned this from a photographer friend: add a tiny bit of eyeshadow that matches your scalp tone directly to the parting area. Not the lace, but the actual part where the hair splits. It creates shadow and depth that cameras read as "real scalp." Before any event with photos, I take test shots with flash in my bathroom. If something looks off, I fix it before leaving the house. And honestly? Sometimes the issue is that your wig is TOO perfect. Mess it up a little. Real hair has flyaways and imperfect sections. Perfection reads as fake in photos.

Why does my expensive human hair wig tangle so much worse than my cheaper one?

Girl, let me tell you about the day I threw my $600 wig across the room in frustration. Not my proudest moment, but the matting was driving me insane. Here's what nobody tells you: expensive doesn't always mean low-maintenance. Virgin human hair, especially if it's very fine (like that premium European hair everyone wants), tangles MORE than coarser textures. It's like how baby hair gets tangled easier than adult hair. My Vietnamese hair wig? Barely tangles. My Russian blonde unit? Matted mess if I don't baby it. The solution isn't to avoid fine hair, but to understand what you're signing up for. Fine hair needs: daily gentle brushing (emphasis on gentle), sleeping in a loose braid or silk bonnet ALWAYS, and deep conditioning every single week. I use a diluted fabric softener spray between washes... sounds crazy but it works. Mix one tablespoon of fabric softener with a cup of water in a spray bottle. Light mist, brush through. The anti-static properties prevent tangles. Also, check if your wig has been treated with silicone. Once that coating wears off (usually after 3-4 washes), the real texture shows up and surprise! Tangle city. Not saying expensive wigs aren't worth it, but match the hair type to your lifestyle. If you want wash-and-go, coarser Asian hair beats European hair every time.